Wednesday, November 21, 2012

Our Newest Addition - Vada H

Our new granddaughter Vada arrived on November 8th.  She is our second grandbaby, but the first for our Vanessa and her husband.  Monday I took these photos for Thanksgiving - well, any excuse to play dress up with the baby!
The one below was inspired by Pinterest.  She has mommy and daddy's wedding rings.  
The wrap is from Pottery Barn Kids.  
I did her Onesie for a Cricut Contest several months ago.  Didn't win the contest, but still love the little squirrel from Create A Critter 2 cartridge.  I layered on each color of ink after cutting vinyl to use as my stencil.  I added the bow after Vada arrived and we knew the boy or girl answer. 
Uncle Trey brought this Onsie to the hospital the night Vada arrived.  So, Trey, this one is for you.
Vanessa ordered her Turkey hat from a shop on Etsy.
We just love our new little doll and her cousin Sierra who will be 21 months old here in a few days.  I am looking forward to doing Christmas photos of the 2 girls together (understanding that it will be a bit more challenging than a sleeping Vada by herself).

More Photos of Vada

I wanted to do a few other photos of Vada.  Love the hot pink tutu!
 
I learned a lot from this session.  Feed baby, change diaper -several times, make baby nice and warm and she sleeps.  After that, you can just move her around however you want!!!  I used my trusty BeautiControl neckwrap heated in the microwave (not too hot) under the white throw and . . .

Wednesday, October 24, 2012

More Maternity Photos

More photos of my sweet daughter and her hubby from this past weekend.
Vanessa sometimes calls the baby her little pumpkin. 


My take on the picture frame photos I've seen on Pinterest
 

Just too cute.

Beth obtained the memorial bricks for my mom and dad at the Garland Sr Citizens Veteran's Garden.  Love the baby's shoes along with Star and Vanessa's feet and the bricks.

Monday, October 15, 2012

Photography sessions!

My youngest daughter, Vanessa, is expecting her first baby next month and we wanted to do some maternity  photos.  We had wanted to shoot lots of outdoor ones, but the weather didn't cooperate.  It was quite cool (by Texas standards) and very windy.  So most of the shots were taken indoors by a window.  Here are my top 3 favorites.

Hey Dad, you'll hear me better soon!
Poor Vanessa got a bit chilled on this one.  We are hoping to do a few more before the baby comes.  This time outdoors and warmer weather!

This past weekend, I babysat my sweet granddaughter in the morning and then her mommy, Beth, helped me do some Fall photos.  These are my top 3 favorites.

My little pumpkin girl.

Love the apple!
No you can't have MY pumpkin!

Monday, October 1, 2012

CDAC Progressive Challenge #21

This is my third challenge from Crafter's Digital Art Center.  This image is from Doodle Pantry and when it first arrived in my email box, I was stumped!  I "slept on it" and here what happened!

   Pamper your PIGGIES!

The card base is from Bazzill's Hot Pink and the layers are from a paper pack that I picked up at a Scrapbook convention a couple of years back.  I folded the pink dot paper and cut it with Stampin' Up's Top Note die with the fold just inside the cutting area to form a card.  I cut the Piggy image with the Top Note die and then trimmed along the perforations.  The Piggy, background and blanket are colored with chalks from Pebbles Inc and her toes are done with Glaze Gel Pen.  The Hot Pink ribbon and the green photo turn are from my stash.
The inside sentiment was created in Word and printed mirror image onto Grafix Rub-onz.  It is great for things you don't have the rubber stamp for!  I created a "pocket" for the gift card.  I located a gift card by doing a Google Search for Pedicure Gift Card, printed and cut it out.

Friday, September 21, 2012

CDAC Progressive Challenge #20

This image is from PriscillaStyles and is part of the Progressive Challenge at (Crafter's Digital Art Center - http://priscillastyles.ning.com.  The kitty just looked so sad to me, like he forgot something important! 
Maybe it was an important person's birthday!

The "wallpaper" is cardstock from K & Company's "happy trails" pad and the sofa is paper from one of the Cricut 6 x 12 pads.  The cat and window are printed on white cardstock and colored with Prismacolor pencils.  The buttons are accented with Smooch Pearlized Accent Ink as is kitty's nose.  

The "OOPS" is from Red Rubber Designs' Savvy Sayings http://www.red-rubber-designs.com/savvy-sayings-rubber-stamp-set.html and the other stamps are from what was The Angel Company's Belated Birthday.  

Thursday, September 20, 2012

Diaper Cake - First for Me

This coming Saturday is a baby shower for my daughter Vanessa.  The theme is "A little pumpkin is on the way!".  Her older sister, Beth, asked me to do a Diaper Cake.  I've looked at them, but never attempted one.  Then Beth asked if maybe I could do it in the shape of a pumpkin!

Several months ago I had purchased a box of Hawaiian Limited Edition Huggie Diapers.  Half of the 72 diapers are an orange color and the other half are blue.  So, half of the battle - pumpkin color is taken care of.  Now, how do do this?  I started with a 16" Wilton Cake Separator Plate, 2 spools of orange ribbon (10 ft each), a 13" apple basket, and the diapers.  I covered the basket with a plastic bag so that it wouldn't snag any of the diapers and I filled the inside of it with the blue ones to give it some weight.  Using the 2 different ribbons, I cut 15" pieces and taped them to the Cake Plate - 6 of the wider ribbon and 6 of the narrow - evenly around.
 
I added the first layer of diapers on the wider ribbon by laying 3 along the ribbon and then pulling it up and taping it to the top.
 I then repeated the process with laying 3 diapers on the narrow ribbon.  This gives the pumpkin ridges.  I added green felt leaves and topped with a cute teddy bear.
The small pumpkins are cut with my Cricut using the Creative Memories - Artiste cartridge.  They will be table decorations.

Sunday, September 16, 2012

CDAC Progressive Challenge #19

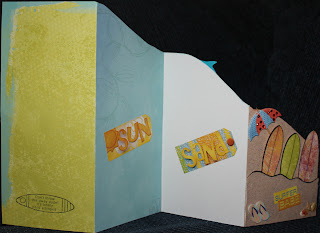
I received this great digi from Tiffany Doodles (Crafter's Digital Art Center - cdacpc 19   http://priscillastyles.ning.com) with the challenge to create a paper craft project with it.  My youngest daughter loves surf boards and I wanted to work on something for her. So, Vanessa, if you are reading my blog, please close your eyes.  :)

The card structure was inspired by one I saw on Pinterest.  There are 4 layers and I cut the first 3 using my Cricut machine.  I layered on the different papers to look like the sand, the sea and they sky.  The digi is of the surf boars and the wavy line of sand that they are stuck into.  I printed the surf boards on white cardstock and then again on 3 different sheets of cardstock for the orange, green and red/orange print.

I added embellishments of flip flops, umbrella, shells and "Surfer Babe" from my stash. 

Inside the card are more embellishments and the Birthday verse from DRS Designs.   
The back side of the card along with a cute rubber stamp from "Hang Loose" in my The Angel Company stash.  I still am sad that they aren't around any more.  Red Rubber Designs has purchased their inventory, but this set isn't available - yet.  The stamp says, "Don't throw this away dude!  It's totally hand stamped!"

Wednesday, August 1, 2012

Red Rubber Designs Contest Entry

My entry for the July Just Because Challenge.  Here is the card sketch we were given to use:
And here is my card:
I used Amberly Grace paper pack from.Red Rubber Designs   The tags are also from Amberly Grace and are stamped with Niagra Mist and Oasis Green VersaMagic ink with the Fanciful Vintage Stamp set.  The shells are the Mini Shells set stamped with Wheat and Sahara Sand,  The shells were cut and popped up onto a background of Bazzill Hazel paper that had been sprayed with Tattered Angels Pearl Glimmer Mist, crumpled and pressed flat to dry.


Stay cool!
Cindie D

Thursday, June 21, 2012

Graduation cards

I needed to make a couple of graduation cards, so I went to Pinterest for inspiration.  This first one was so cute, but the link was broken and therefore, no instructions.  Never fear - - - I worked it all out!


This is an A10 (4 x 9.25) card.  The black cardstock for the card base is 10 x 7.25.  To score the card, make sure the 10 inch side is across the top of your board and score at 1, 3, 7, & 9.  Fold the 3" and 7" scores toward each other and then the 1" and the 9" marks back to make the front pleats of the gown.  Glue them in place.  Cut 2 pieces of black at 2 7/8" square to form the cap.  I placed a brad in the middle before I glued them together.  I glued the cap to the left side of the card so that the total height equals 9.25".  I did have to add a 1" strip of black to the left side of the card flap as there was a small gap after the card was folded colosed.  I actually used a scrap of the black cut 1" x 7.25.  I like the added piece as it makes it look like the inset for the zipper of the gown.  The white cardstock center is 3 7/8" x 7 1/8".  You could do slots for money or a check.  Because it is an A10, it fits a business sized envelope.

I also another cute card on Pinterest that I wanted to try.  This one is courtesy of Dawn Olchefske at www.dostamping.typepad.com.  She has the size for an A2 (4.25 x 5.5) card, but I wanted it a bit larger, so I did an A6 (4.5 x 6.25).
 My black cardstock was cut 4.5" x 10.75".  Score the long side at 6.5" and then mark 2.25" ABOVE and BELOW your score.  Also mark at 2.25 across the short side.  Score an "X" from the marks on either side.  Cut the angle of the hat from the center mark at the top of the card to the top of the "X" on each side.  Fold along all score lines and fold the middle section inward to create the hat.  I set a brad in the middle of the "hat" and attached a faux tassel.  The white cardstock is cut 4" x 5 7/8" for the lower portion of the card.  I marked at 2" at the center of the top and 2" down on each side.  Cut the angle from the marks to form the inside layer.  The square layer of white for the underside of the "hat" is cut 3 1/8" square. 


Congradulations to all of the Class of 2012!

Friday, June 15, 2012

Stampin' Up's My Digital Studio

I have had this digital program for quite some time and have built up a "library" of 85 brush sets.  So, I decided it was time to start doing something with all of this.
 This was a from a Designer Kit - Happy Birthday, Labels.  I inserted the label onto a "sheet" of white cardstock and then printed it with several other images.  I cut it out and added the white ribbon and popped it up on top of a beautiful sheet of blue paper that was embossed with a Happy Birthday folder.

For my Son-In-Law's Father's Day, I wanted to make a card using All In The Family.  To do this with rubber stamps would be a major task.  The heads are NOT connected to the bodies which are NOT connected to the legs or arms.  However, in My Digital Studio, it is very easy to move all of the parts to where they need to be.  I even added the glasses for both my daughter and son-in-law!  I then colored them with Copic markers.  The background "happy" paper is from a Cricut pad that I got on clearance and the red base cardstock is from my stash.  "Happy Father's Day!" is a rub-on from My Sentiments Exactly. 

For my second Son-In-Law's first Father's Day (baby is due Nov 8), I used the typewriter image from "Your My Type" and enlarged it to 4.25 x 5.5.  I placed the image at the bottom of the 8.5 x 11 "sheet".  I added "dear dad" from Holiday Blitz, "2" from Schoolbook Serif Numbers, and the bumblebee from Sweet Summer.  After it was printed, I trimmed the cardstock to 4.25 x 11 and folded it in half - forming an A2 card.  I trimmed the card to the shape of the typewriter bottom and accented with Black Enamel. 

The inside "Happy Father's Day" is from All Holidays and the tie from Holiday Blitz.  It is so easy to change the color of the image using all (even discontinued ones) Stampin' Up inks!

Lastly I did a generic card using my newest purchase, The Open Sea.  I printed the manifest in Not Quite Navy on white cardstock.  I used several ink pads to distress to an aged look.  The ship from The Open Sea was printed in black and colored using Prismacolors and cut with Spellbinder's Curved Rectangles along with a mat in dark blue cardstock.  The mat was cut the same size as the ship and enlarged by cutting it into 4 pieces and gluing them onto the back of the ship's piece.  I cut little scraps to fill in the gaps.  The anchor was also printed in black and colored with Prismacolors, cut out (oh what fun) and tied on with scrappers' floss. 


I am a total fan of My Digital Studio!  The brush stamp sets are VERY well priced and very versatile!

Friday, May 25, 2012

Completed the Intermediate Copic Certification

Had a great day last Saturday, May 19th,  doing the Intermediate class with a great bunch of gals from all over Texas and even a couple from Oklahoma.  The class was taught by Colleen Schaan and assisted by Lori Craig.

Now I have to practice, practice, practice!

Monday, April 30, 2012

Had some time to do more cards! The first one was done as a special request for a teen grandson of a friend of mine.  I had picked up the stamp at Hobby Lobby awhile back and it was sitting on the shelf talking to me.
The background is Metallic Silver that is embossed with a Tim Holtz's folder, the clouds are Memory Box and the orange and white image are cut with Spellbinders Label 10 and the banner with Spellbinders Ribbon Banners.  The motorcycle is colored with Prismacolors and the side car was cut and popped up.

I also had time to play with my Cricut Imagine and the Greeting Cards Inside and Out.  First I played around with a Graduation card.
This was cut on my pearl cardstock from FasClampit.  I scored the blue edges of the card on my ScorePal and then punched the holes with the Cropadile.  I added a Jolee 3D owl sticker that doesn't show up will here.  The inside:

Next was a cute Mermaid/Surf board card.
I added glitter to accent the various pieces on the outside.  Here is the inside of the surf board which also has multiple layers.  I printed the cardstock from a pattern on the cartridge and mounted the surfboard on it.

Lastly, here is a graduation card that was mass produced for a swap that I am in.  I ran the cardstock through an embossing folder and then cut silver cardstock to the size of the window and ran it through an embossing folder too.  I added the Jolee 3D Owl stickers and within and hour had made 14 of them!
I colored one of the stars with glitter gel to finish it off.


Thursday, April 26, 2012

Altered T-Shirt Neckline

Recently I came across a T-Shirt that I loved, but didn't like the way it felt when I wore it.  I decided it was because the neck binding was too high.  So, I worked on it.  Now I love the shirt and I am "fixing" other ones, too.  Here is what I did - - - -
After removing the tags (thank you to the person who decided to just print stuff on the inside of the shirt rather than having these neck ticklers), I grabbed what had been my mother's Pinking Shears.
Starting at the back, I trimmed the binding using the top stitching as a guide.  I cut just to the right of it.
Each time I moved the scissors, I placed them in the zig/zag of the prior cut and worked my way around to the starting point.
Here is my finished neckline!

Oh so much better!!!!