Saturday, August 3, 2013

New Toy!!!!

A few weeks ago I was looking for another die cutting machine - one that would give me LOTS of freedom. After looking at videos and reading comments, I decided on the Silhouette Portrait.  Even though it is an 8x12 cutting surface (rather than the 12x12), I know it will do what I am looking to do.
This machine doesn't require cartridges and will the Studio Designer Edition, you can print(on your existing printer) and then cut the image on the Silhouette.  There is also the option to buy cut files from their website.

Last night I was looking at what was available and found a Birthday Cake Flip Card.  For just .99 it jumped into my "cart".  I played with it today and here is what I made:


 Now to try to make one that is suitable for a guy!  That is what I need to do, but this one doesn't look manly enough.  :)


Tuesday, July 23, 2013

Baby Boy Gift

A sweet friend of mine had her baby last week.  They decorated his room in a Western Theme and I started playing around with my Cricut.  I used "Old West" cartridge and this is what happened;
She and her hubby are both Texas A&M grads and "Howdy" has special meaning for Aggies.  All items in the frame are cut from "Old West" except the Texas shape ("50 States") and Nash ("Noah's ABC Animals").
The frame is from Hobby Lobby and was exactly what I had in mind.

I had made a baby card when I first heard that they were expecting a boy, but it wasn't in the Western theme, so I got to work doing another one.
The background is embossed using the Tim Holtz Woodgrain folder.  "Welcome Baby" is from a Cuttlebug Embossing Combo of the same name.  The cute little cowboy was from The Angel Company "Wild West" rubber stamp as was the "Cowboy Up" (from a different TAC set).  He is colored using Copic markers.

These will go in the mail tomorrow to Leander, Texas.

Tuesday, July 2, 2013

Sizzix Pop 'n Cuts to Flip Flop Card

I love the Sizzix's Pop 'n Cut card dies!  I have several in my "collection" including the June release of Karen Burninston's Label Window, 3D #658372.  I use it with my Pop 'n Cut card base from Stampin Up.
I made this card following the photos and video at http://karenburniston.typepad.com/i_am_not_lefthanded/page/2/


Again, the base is from Stampin Up and I added double sided cardstock to fill in the openings in the back of the card.  The stamps are from my stash and rhinestones are ones that I picked up a the scrapbook convention last month.

Since it is nice to be able to do more than one type of card with any one tool, I found (quite by accident) that I could also make a Flip Flop card using the same die.  Here is my tutorial for it.

Place the die insert in the base.
 Line up the Marks on the insert with those on the base.
 This is how it will look after it is cut and the middle pieces are removed.
Fold the card in half at the 5 1/2" mark.  It isn't necessary to score it as there are fold marks on the cardstock.
 At the center of the label, fold the top back and burnish.  It will look like this:
 Now cut 1" off of the right edge of the card.
With the card folded, place it in the cutter so that the front of the card is down and cut the card to 5 1/2".
 If desired, round the corners.
 Cut double sided cardstock to 4 1/4" by 2 1/4" and apply adhesive to the back side of the card as shown below.  I placed my silicone sheet inside the card to keep any adhesive from sticking my card closed.
 Add the double sided cardstock to the back of the card.
With the card opened, stamp the front of the card.
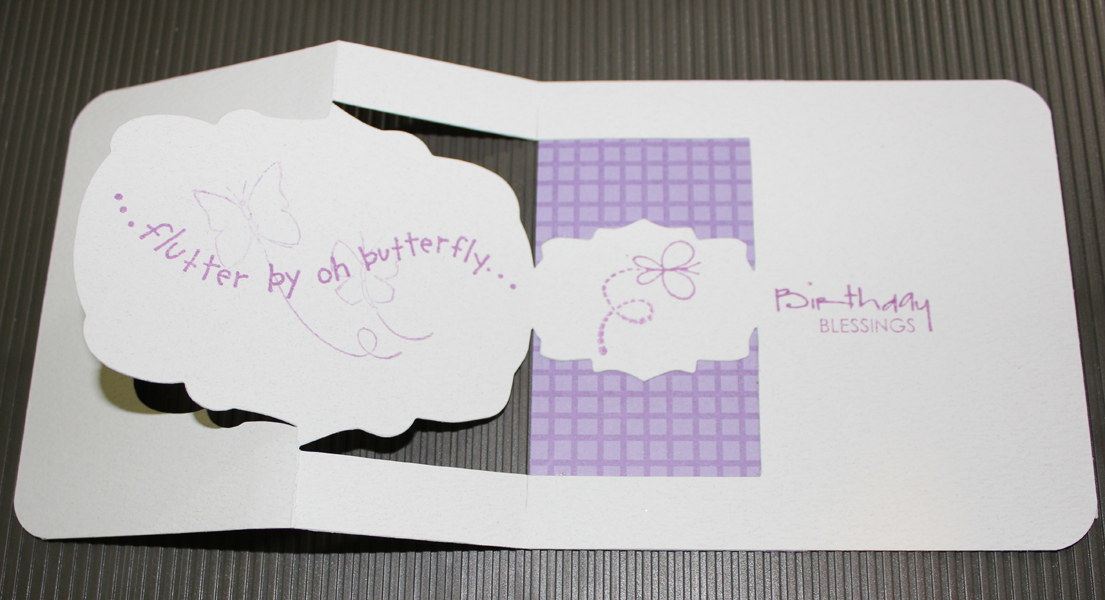
 I stamped the inside of the label with butterflies that I stamped off first to give it a lighter shading before I added the "...flutter by oh butterflies..." sentiment.  I chose a Birthday Blessings stamp that would hide beneath the label when the card closes.
 I cut more cardstock in the die to cover the front left side of the card.
 And butterflies from Stampin Up's Beautiful Wings Embosslits Die layered with a Martha Stewart Butterfly punch.  The center of the butterflies are embellished the rhinestones that I purchased at the scrapbook convention.  The two purple flower embellishments were found there, too. 
Here is the finished card.  Note that the label "flips" to reveal a message on this card whereas on the original card, the front of the label popped over and was seen both from the front and inside the card.

Thank you for looking.  If you have any questions or comments, please let me know.  This is my first attempt   to do a tutorial on my blog.  I wasn't brave enough to attempt to do a video one and besides, I didn't have a camera assistant available.

Sunday, February 3, 2013

Inspired by Pinterest

I have seen lots of things on Pinterest and yesterday I "played" with the Triple Stamp technique - with a twist.  I did mine in My Digital Studio.  Using Wonderful Wings Digital Brush Stamp set, I placed Butterfly 2 on my opened project.  With the Butterfly outline in black, I added splatters of colors in Only Orange and Summer Sun - shrinking the size of the splash to the size of the Butterfly's wing.  After getting it all like I wanted it, I grouped all of the images into one and then copied and pasted it 2 more times on my page.  I printed the 3 images (original and the 2 copies).  I trimmed the first image 5 x 3.75, the second one to 4 x 2.75 and the 3rd one to 3 x 1.75.  I cut 3 pieces of black cardstock to 5.5 x 4.25; 4.25 x 3; 3.25 x 2 and assembled onto an A2 card.  Here is my digital take of the Triple Stamp technique:

So far it is a generic card, but it could become a Birthday, Get Well, Thank you, etc. 

Also a submission for Flutter By Wednesday Challenge #225.

Friday, January 4, 2013

Little MIss Muffet Anything Goes - Challenge #51

I just love this Little Sock Monkey Boy! 
 
I used the Cheeky Monkey digital image from Little Miss Muffet Stamps and colored him with Copic Markers.  The background is done with Pebbles Classic Chalks and Happy Birthday banner is a Deadbeat Designs.  The image is cut using Spellbinders Labels Fourteen. 

This became a card for my Great Nephew's 4th Birthday!

Wednesday, November 21, 2012

Our Newest Addition - Vada H

Our new granddaughter Vada arrived on November 8th.  She is our second grandbaby, but the first for our Vanessa and her husband.  Monday I took these photos for Thanksgiving - well, any excuse to play dress up with the baby!
The one below was inspired by Pinterest.  She has mommy and daddy's wedding rings.  
The wrap is from Pottery Barn Kids.  
I did her Onesie for a Cricut Contest several months ago.  Didn't win the contest, but still love the little squirrel from Create A Critter 2 cartridge.  I layered on each color of ink after cutting vinyl to use as my stencil.  I added the bow after Vada arrived and we knew the boy or girl answer. 
Uncle Trey brought this Onsie to the hospital the night Vada arrived.  So, Trey, this one is for you.
Vanessa ordered her Turkey hat from a shop on Etsy.
We just love our new little doll and her cousin Sierra who will be 21 months old here in a few days.  I am looking forward to doing Christmas photos of the 2 girls together (understanding that it will be a bit more challenging than a sleeping Vada by herself).

More Photos of Vada

I wanted to do a few other photos of Vada.  Love the hot pink tutu!
 
I learned a lot from this session.  Feed baby, change diaper -several times, make baby nice and warm and she sleeps.  After that, you can just move her around however you want!!!  I used my trusty BeautiControl neckwrap heated in the microwave (not too hot) under the white throw and . . .